

(And Finally Control Your Money)
Do you ever look at your bank balance after a big client payment, feel a rush of excitement, and then—within a week—feel a pit in your stomach realizing you forgot to set aside money for taxes?
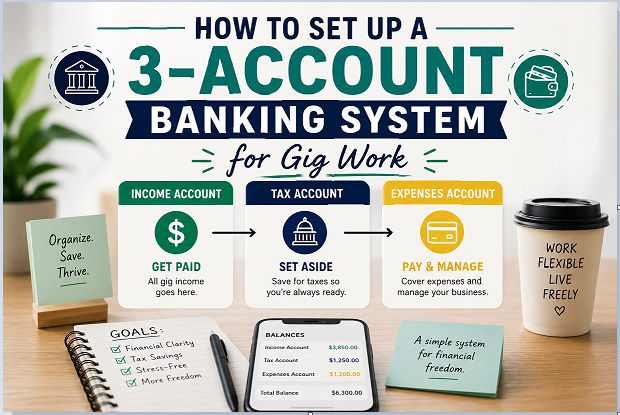
The secret solution? A simple 3-account banking system for gig work that separates your money with purpose.
This method separates your professional revenue from your personal life, effectively turning your finance management into an automated process.
If you are nodding your head, you are not alone.
The “feast or famine” cycle of the gig economy makes traditional budgeting difficult. When your income fluctuates, money management often takes a backseat to client deadlines. However, the most successful freelancers don’t just work hard; they manage their money with precision.
In this guide, we will break down exactly how to set this up to lower your tax stress and keep your business profitable.
Why Gig Workers Need a Separate Banking System
Many freelancers start their journey using a single personal checking account for everything. You deposit client checks, pay for your software subscriptions, buy groceries, and (eventually) pay your quarterly taxes from that same pile of money.
Without a system, you might:
- Spend money meant for taxes
- Mix personal and business expenses
- Struggle to save consistently
A structured banking setup fixes all of that.
This “commingling” of funds is a recipe for disaster.
When business and personal money mix, it becomes impossible to track your true profit. You might overspend on personal items because you think you have more money than you actually do, only to realize later that 30% of that balance actually belongs to the government.
By separating your finances, you gain two major benefits:
- Clarity: You always know exactly how much “real” profit you have.
- Peace of Mind: Your tax liability is safely stored away, untouched.
Internal Link Suggestion: Check out our article on [The Best Digital Tools for Freelance Accounting] to see how to pair this system with software.
What is the 3-Account Banking System?
The 3-account system is a simplified version of the “Profit First” accounting method, customized for the gig economy. It focuses on isolating money based on its purpose rather than its source.
Here is the hierarchy we will set up:
- Income Account (Main Hub)
- Tax Account (Your Safety Net)
- Personal/Spending Account (Your Paycheck)
Let’s dive into how to set this up step-by-step.
Step-by-Step: How to Set Up a 3-Account Banking System for Gig Work

Step 1: Open Your 3 Accounts
You can use the same bank or different ones. Just make sure:
- No or low fees
- Easy transfers
- Mobile app access
Here’s what you need:
1. Income Account (Business Account)
This is your central operating account. Every single payment you receive from clients—whether from Upwork, direct invoices, or PayPal—should land here first. Use it for:
- Client payments
- Platform payouts (Upwork, Fiverr, etc.)
- Business-related transactions
Key rules for the Income Hub:
- Do not spend from this account. This is a transit account only.
- Keep it separate. If possible, use a business-specific checking account.
- The Routine: Once a week (or whenever you get paid), look at the balance and distribute the funds into the other two accounts.
2. Tax Account (Savings Account)
This is the most important account in your system. Many freelancers get hit with massive surprise tax bills because they spent their tax money on operating expenses or lifestyle upgrades.
How to manage the Tax Vault:
- Calculate your rate. Estimate your total tax burden (Self-employment tax + Income tax
Recommended:
- 20%–30% of income (depending on your country)
- Automate the transfer. When a client pays you, immediately move that percentage into this account.
- Hands off. Treat this money as if it does not exist. Do not touch it until it is time to pay your quarterly estimated taxes.
By the time April rolls around, you won’t be scrambling for cash. You will simply transfer the funds from this account to the tax authorities.
3. Personal Account (Your Salary)
Many freelancers are guilty of “taking what’s left.” They pay all their expenses, and whatever remains is their “salary.” This is not a sustainable way to build wealth.
Instead, define your salary as a consistent amount or a clear percentage of your revenue.
This is your spending account.
Use it for:
- Rent
- Groceries
- Bills
- Lifestyle expenses
Think of this as your “paycheck.”
Why this works:
- Stability: It helps you maintain a consistent lifestyle even when your gig income fluctuates.
- Discipline: If you have to pay for business expenses (like software, hardware, or marketing), they come out of the Income Hub before you move your salary to this account.
- Growth: If your income increases, you can decide to increase your salary or reinvest the surplus into your business.
Pro Tip: Consider opening your Salary Account at a different bank than your Income Hub. This creates a psychological barrier that prevents you from “borrowing” from your savings.
Step 2: Decide Your Percentages
Your split depends on your situation, but here’s a simple starting point:
- 25% → Taxes
- 50–60% → Personal Spending
- 15–25% → Savings/Buffer (optional extra account)
Adjust as needed, but stay consistent.
Real Example of the 3-Account System
Let’s say you earn $1,000 from gig work.
Here’s how it looks:
- $10,000 → Income Account
- $2500 → Tax Account
- $7500 → Personal Account
Simple. Clean. Stress-free.
Step 3: Set Your Income Flow System
Here’s how money should move:
- Income → goes into Income Account
- Transfer % → goes to Tax Account
- Remaining → moves to Personal Account
This flow creates automatic discipline.
1. Link Your Accounts
Ensure all three accounts are easily accessible via your primary banking app. Use a bank that allows for instant internal transfers.
2. Set a “Money Date”
Schedule a recurring 30-minute meeting with yourself every Friday or Monday morning. During this time:
- Check your Income Hub.
- Transfer the required tax percentage to the Tax Vault.
- Transfer your predetermined salary to the Salary Account.
3. Review Your Percentages Quarterly
Your income might change. If you land a high-paying retainer or a major project, your tax bracket might shift. Revisit your tax percentage every three months to ensure you are setting aside enough.
Step 4: Automate Transfers (Game-Changer)
Manual transfers are easy to forget.
Instead:
- Set automatic transfers weekly or after payments
- Use banking apps or rules
Automation removes decision fatigue—and keeps you consistent.
Step 5: Pay Yourself a “Salary”
Instead of randomly spending, set a fixed amount you transfer to your personal account weekly or monthly.
This helps you:
- Budget better
- Reduce stress
- Create financial stability
Even if your income fluctuates, your lifestyle doesn’t have to.
Common Mistakes to Avoid
Even a great system can fail if used incorrectly.
Watch out for these:
❌ Mixing Personal & Business Money
This creates confusion and tax headaches.
❌ Not Saving for Taxes
Skipping this step can lead to debt.
❌ Overcomplicating the System
Keep it simple. You don’t need 10 accounts.
❌ Inconsistent Transfers
Discipline matters more than perfection.
Benefits of the 3-Account Banking System
Once you implement this, you’ll notice:
✅ No more tax panic
✅ Clear view of your finances
✅ Better spending habits
✅ Easier bookkeeping
✅ More savings over time
It’s a small setup with a huge impact.
Pro Tips to Maximize This System
Want to level up? Try this:
- Use a high-yield savings account for taxes
- Add a 4th account for emergency funds
- Track expenses weekly
- Review your system monthly
Who Should Use This System?
This method is perfect for:
- Freelancers
- Digital nomads
- Side hustlers
- Remote workers
- Content creators
If your income isn’t fixed, this system is for you.
Final Thoughts: Keep It Simple, Stay Consistent
Managing money as a gig worker doesn’t have to be stressful.
By setting up a 3-account banking system for gig work, you create structure in an unpredictable income world.
It’s not about earning more—it’s about managing smarter.
Ready to Take Control of Your Finances?
Start today:
- Open your 3 accounts
- Set your percentages
- Automate your transfers
The sooner you start, the sooner your finances feel easier.
👉 Call-to-Action:
Want a done-for-you system? Download our Gig Worker Finance Starter Kit and set up your money in under 30 minutes.